Saturday, August 31, 2013

Today was an electronics config day, while we are trouble shooting the lock mechanism. We ended up jumping over to the Arduino Mini to get the circuit set up. We found that the magnet sensor wasn't reliable enough so we ran out to the electronics store to switch it out for a limit switch and some more voltage reg. parts. It is a pretty complex circuit we are having to program for this particular element but I have the parts printing out now that will house it all.

Matt working with a very small micro controller, which burnt out because of back voltage from the solenoid. So we switched to Arduino Mini for now.

The lock box housing is being printed out now, and the pin printed earlier this morning.

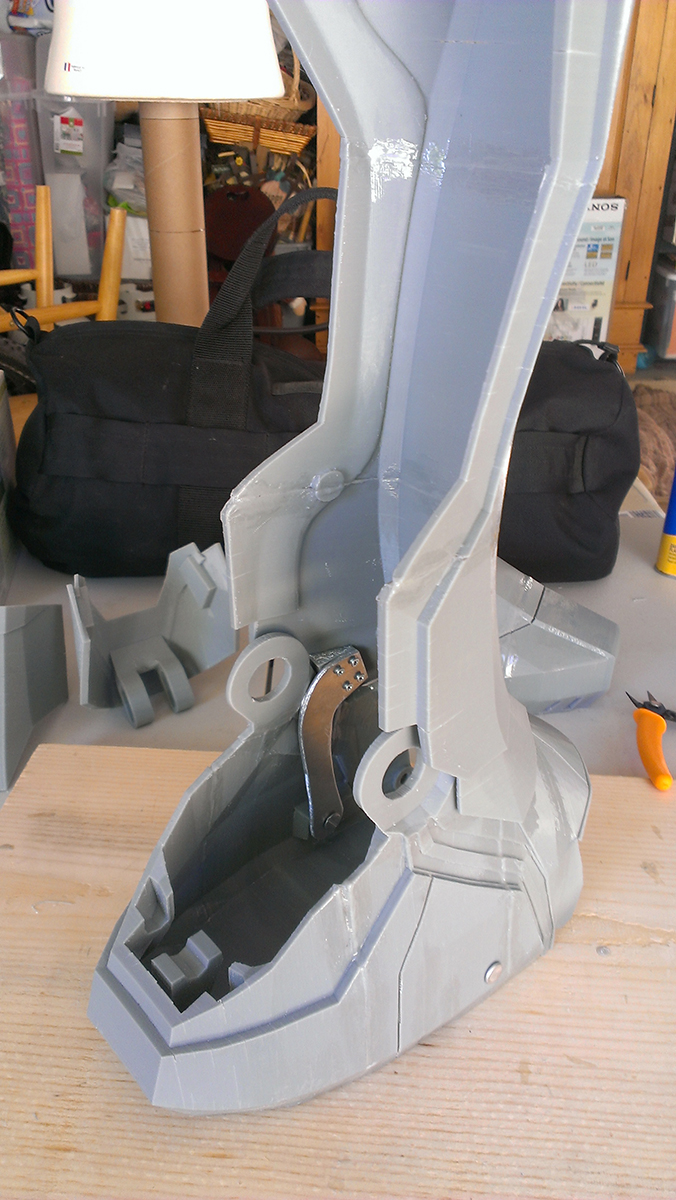
Yesterday, I was able to CNC out the aluminum arms for the shin plate as well! Then I installed them and put the pins into the front of the boot.


The head slipped on a couple attempts, but I was able to cut out a couple arms. 

The large vice grip is a must! 
I screwed in the aluminum arms, ready to install.


The toe and shin are ready to get hooked up to a couple more things for motion control.


Up next... printing the rest of the calf plate, installing the lock mechanism, adding sprints, other joints, etc. Then onto the gauntlet!


Friday, August 30, 2013

Lately, I have been learning the CNC machine workflow more. Between working two jobs it has been hard to find ample time, but the time I am working lots gets done! Here are a couple update pics!

Using the Mach 3 interface to operate the execution of the G-code and table.

Cutting out of plastic to prototype the shin arms before cutting them out in aluminum.

Yesterday I quickly welded the boot together and just waiting for more filament to arrive in the mail to print the rest of the calf! I will also be working on printing the lock mechanism today so we can get that fitted with the electronics tomorrow.


Sunday, August 25, 2013

While I'm printing consistently twice a day, here is a look at my little work area in the garage. So you know I'm not ordering things from Shapeways, and you can see some of my processes.

A table for working on the boot assembly and for the electronics team to come over and work also.
I will need to order some more grey plastic rolls soon. Here I started printing the mid shin piece.


What you dont see in the pretty pictures of the boot pieces, the scraps from rafts and supports.
The boot V2 so far, with shoe done now and working on the shin.

You can see these are not glued or sanded at all, just right off the printer.

Saturday, August 24, 2013

Matt came over this morning and we configured the boot locking system (looks like it will work great) and worked more on the arduinos, sheilds, ordering parts, and measuring components for the housings in the gauntlet. The LCD screen with buttons, and Arduino Mini will be some starter parts for the gauntlet control panel.

Yesterday I printed out the heel peice and then last night the front portion of the shoe. Unfortunately due to temperature change over night there is a pretty significant split on the other side of the front of the shoe peice that will have to be fixed in post or reprinted.
Here you can see the heel joint fit really well and glides backward smoothly.


Friday, August 23, 2013

Well, I got some posters printed out for the fair and a couple pieces of the boot are already finished printing. Right now the heel slice of the boot is printing out and should be done tonight!

ah the beginnings :)

here the shoe has to be cut up into three pieces like last time. The heel is printing out now.

Wednesday, August 21, 2013

Today I am scaling the boot to my foot by using something like Minecraft blocking. Then it will be all set to start printing!


Tuesday, August 20, 2013

Just finished this 4k by 8k poster for the fair! :)


Yesterday and today I spent some good hours finishing the boot. I only have a couple internal details that I need to work on, but those are aluminum pieces for the CNC machine anyways. I am so excited about how this turned out! I rendered pics that demonstrate the movement of the boot... (click on the pics to see full resolution)

I hope that I can paint it as good as it looks in the model!

Check out the linear actuators, which for now will be shock like mechanisms that will be exactly this size.


Taking a step 1, the shin and calf move together forward.

Taking a step 2, the whole boot moves forward on toe joint.


What a sweet angle!


Well, I am exited to start printing the boot out as soon as I have all the details looked over! This second version of the boot will not only look sweet, but the functionality and joints are well improved also. Hopefully I can get the boot done for the fair next month!


Friday, August 16, 2013

I'm now working on some of the joints before getting to the calf. Here is the modeling view of the heel joint so far. 


It takes some time to make sure there are the correct spaces between surfaces for washers etc.

Thursday, August 15, 2013

Its been a while since posting on the project here! I have been working two jobs, going on trips, working on my printing setup, designing mechanics etc. Here are some new pieces I modeled this morning though. I will get to the calf tomorrow. The majority of the work is planning the aluminum parts and electronics inside the boot.

I will probably add some thickness to the shin plate, at least .25 in.


I'm excited to model the mechanical parts inside as I have designed them already and working on cutting the aluminum for them now.